Audio distortion issue with the product
When a speaker is already confined within a limited enclosure, mismatched power ratings between the amplifier (IC amplifier) output and the speaker specs, or an overloaded backend load, will inevitably lead to a dead end where "audio clipping/distortion occurs regardless of the speaker's wattage." The core pain points and corresponding solutions are analyzed below:
Core Pain Point Analysis
1. The Amplifier is in a State of "Clipping Distortion"
- Myth: Many believe that using a speaker with a higher wattage than the amplifier (e.g., pairing a 10W or 20W speaker with a 3W amplifier) guarantees no audio distortion.
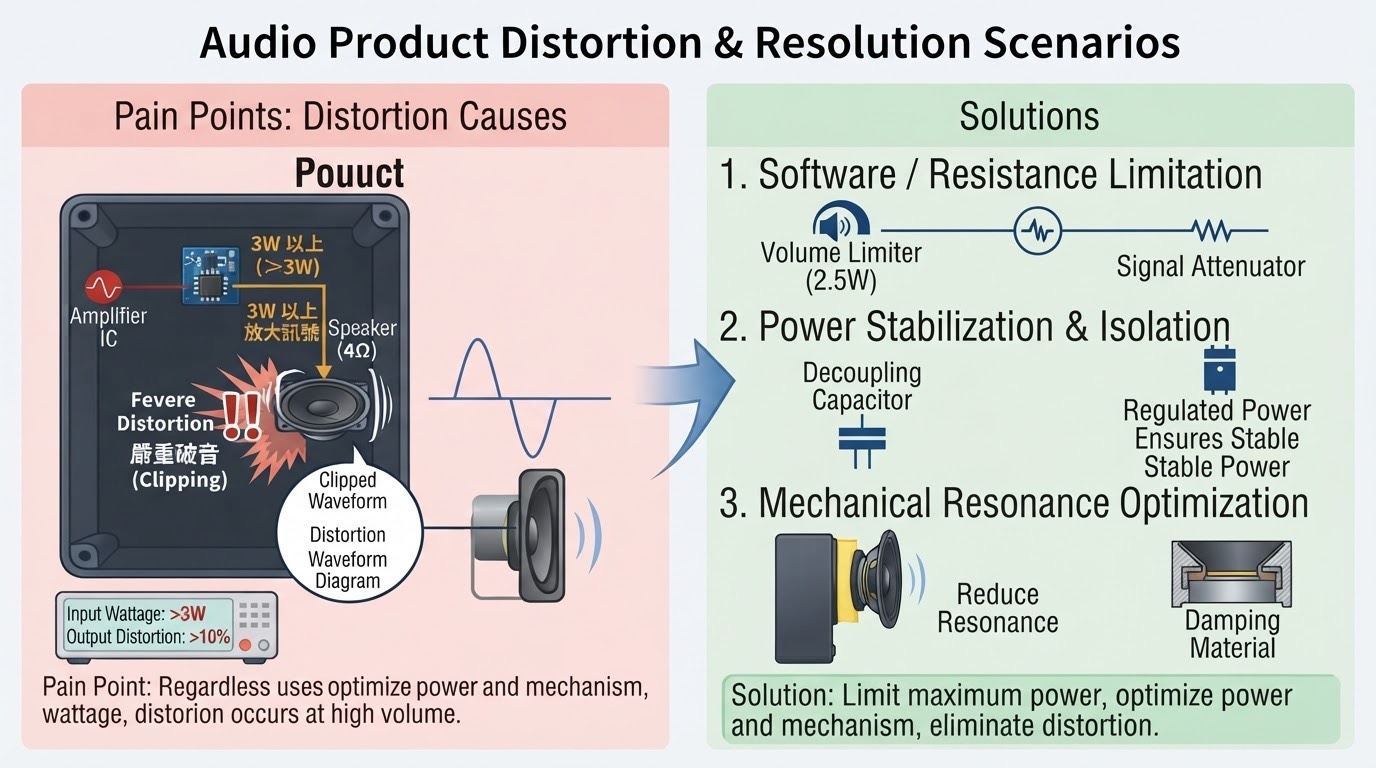
- Fact: When a 3W amplifier IC is pushed to its maximum volume, exceeding its linear output capability, the output waveform becomes clipped. The signal delivered to the speaker is no longer a clean sine wave, but a distorted signal packed with high-frequency harmonics. This type of signal causes the speaker voice coil to overheat and drives the diaphragm past its physical limits. Consequently, whether the speaker's power handling is 10W or 20W, it will still produce cracked, harsh, and distorted noise.
2. Impedance Mismatch and Efficiency Discrepancies
Amplifier ICs are typically designed to operate under specific load impedances (e.g., \(4\Omega\) or \(8\Omega\)). If the selected speaker's impedance is too low (or drops sharply at certain frequencies), it will cause the amplifier's output current to overload, triggering early protection mechanisms or severe distortion.
3. Mechanical Resonance and Enclosure Volume Effects (Acoustic Short Circuit)
If the product's internal space lacks proper airtightness or isolation from an independent acoustic enclosure, sound waves from the rear of the speaker will diffract directly to the front (acoustic short circuit{C}). Alternatively, vibrations hitting the product's outer housing structure will also result in severe rattle and physical distortion.
3. Mechanical Resonance and Enclosure Volume Effects (Acoustic Short Circuit)
If the product's internal space lacks proper airtightness or isolation from an independent acoustic enclosure, sound waves from the rear of the speaker will diffract directly to the front (acoustic short circuit{C}). Alternatively, vibrations hitting the product's outer housing structure will also result in severe rattle and physical distortion.
Solutions
1. Restrict the Maximum Volume at the Input Stage (Software or Resistor Limiting)
- Approach: If the distortion is caused by the IC being pushed to its limits, the quickest fix is to limit the maximum output power to around 2.2W–2.5W before the signal enters the amplifier IC. This can be achieved via software maximum volume settings or by adding a voltage divider resistor in series at the input stage.
- Result: This ensures the amplifier never enters the "clipping" zone, sacrificing a negligible amount of maximum volume in exchange for pristine audio clarity.
2. Inspect the Power Supply
- Approach: Many 3W amplifier ICs (such as common Class D amplifiers like the PAM8403) are highly sensitive to their power source. If the current supply is insufficient or the voltage fluctuates (e.g., using a low-quality 5V USB power source), the voltage will sag instantly during musical peaks, causing the amplifier to collapse and generate severe distortion.
- Adjustment: Ensure the power supply has adequate current headroom, and connect appropriate decoupling capacitors (such as \(100\mu\text{F}\) paired with \(0.1\mu\text{F}\)) in parallel at the power input to filter out noise and stabilize the voltage.
3. Adjust the Amplifier Gain
- Approach: Many audio ICs feature external or internal gain setting pins. If the output level from the front-end signal source (such as a Bluetooth module or decoding board) is inherently high, and the amplifier gain is set too high, the system will overload—much like a microphone clipping from being too loud.
- Adjustment: Lower the hardware gain of the amplifier to prevent the front-end signal from clipping immediately upon amplification.
4. Optimize Mechanical and Acoustic Environments
- Physical Isolation: If the product's interior is cramped and the speaker is too close to other components or the housing, apply foam tape or rubber gaskets to absorb vibrations and prevent structural resonance.
- Rear Damping: If space permits, pack an appropriate amount of acoustic cotton (polyester fiber fill) behind the speaker to reduce standing waves and reflection interference inside the enclosure.